

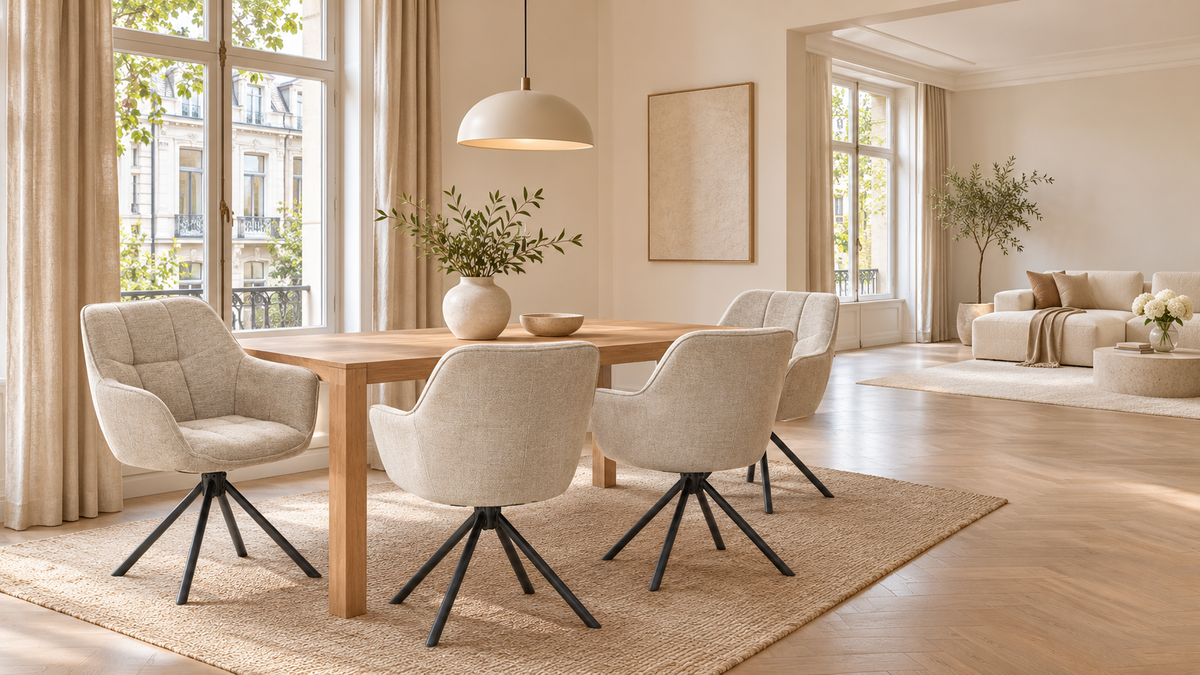
A dining area feels established when you understand where it begins, how to reach it and what belongs around the table. A wall can do that job, but an open-plan room needs other clues. Furniture position, the view from the sofa, a light above the table and the way people move through the room can work together to make the dining area easy to recognise.
Start with the ordinary room rather than an empty floor plan. Someone may be sitting at the table while another person opens the balcony door; a chair may be pulled out while dinner comes from the kitchen. This guide helps you plan for those moments, compare two different household layouts and test your decisions before buying furniture. All dimensions in the worked examples are illustrative, not product specifications or universal clearance rules.

1. Give the dining area a clear everyday purpose
Write down what happens at the table during a normal weekday. Breakfast, an evening meal and a short conversation may be the main activities. In another home, the table also holds homework and a laptop before dinner. These patterns determine which connection matters most: a short serving route to the kitchen, a calm view towards the garden or a position where someone can join a conversation in the living area.
Separate daily requirements from occasional arrangements. If four people eat here every evening but you host a meal for eight twice a year, draw the daily arrangement first and create a second plan for visitors. Otherwise, a room can spend most of the year working around an arrangement that rarely happens. Keep the occasional plan credible by deciding where displaced furniture will actually go and how the route to the kitchen will remain usable.
Choose three priorities that can guide later trade-offs. For example: the balcony door must open fully, someone must be able to walk past an occupied chair, and the table should remain visible from the kitchen. A wish for a particular pendant or a dramatic chair shape can then be assessed against these priorities. Discuss the list with everyone who uses the room so one person's convenient shortcut does not become another person's daily obstacle.

2. Draw the room's fixed features before placing furniture
Make a simple measured sketch showing walls, door openings, windows, radiators, columns and built-in cupboards. Include the direction in which doors open and the space a drawer needs when fully extended. Add sockets and existing light connections as useful information, without assuming that they dictate the final table position. A sketch can be rough and still be useful if its measurements come from the room rather than a property brochure.
Measure awkward points separately. A window sill may project into the area where a chair back would stand, and the lowest part of a radiator valve can matter more than the radiator's main body. Mark these projections on the drawing. Photograph a tape measure beside any uncertain detail, especially when discussing the plan with a partner or asking a furniture specialist about a specific chair. This keeps the conversation tied to the same reference point.
Now add the furniture you intend to keep, using its outside dimensions. Show the sofa at its actual depth, the sideboard with its handles and the table at its widest point. Leave loose decoration out of this first drawing. You are establishing the shape of the usable room. Later, a plant or floor lamp can support the arrangement, but it should not conceal a conflict that was already present between the larger pieces.

3. Plan routes between activities
Trace the journeys people make most often: entrance to sofa, kitchen to table, table to balcony and living area to a cupboard. Use different coloured lines if that makes the drawing easier to read. The most direct line is not automatically the route you should keep, but repeated crossings through the occupied dining area deserve attention. A pleasant arrangement makes the usual journeys obvious without asking everyone to squeeze around the same chair.
Test routes with the furniture in use. Sit someone at the nearest dining place, pull out the chair as they normally would and open the cupboard that is used at mealtimes. Walk the route carrying an empty tray. Watch for changes in direction, contact with chair backs and moments when two people need the same narrow patch. The result is more informative than measuring a gap while every chair is neatly pushed under the table.
Different households need different passing space. A person using a walking aid, a child moving between rooms and two adults carrying plates will not use an opening in the same way. Reproduce the activity that matters in your home and preserve any necessary accessibility provision. Record the tested position of the table with removable floor marks so you can compare another layout without losing the one that already worked.

4. Give chairs room to move, not just room to stand
The dining zone includes the table, the chairs and the movements around them. Draw a second outline around the table to represent occupied seats and the space used when someone stands up. This outline will vary with the chair, the user and the table base. A chair that tucks in neatly may still need substantial space when pulled back, while a swivel model introduces a different movement to check.
Use an existing chair to rehearse the movement, then compare its outside width, depth and arm height with the model you are considering. An approximate stand-in helps you discover conflicts; it cannot prove the new chair's fit. Keep the candidate's published measurements beside your drawing and ask about missing dimensions. When assessing a swivel chair, consider the rotating outside shape and neighbouring furniture as well as the position of its feet.
Pay particular attention to a sofa behind the dining table. Measure and test from the part of the sofa that projects furthest, rather than its feet or a convenient point at floor level. A cushion, curved arm or angled back can affect the route. Try sitting on the sofa while someone leaves the table: two areas that look comfortably separated in a photograph may interact much more closely during ordinary use.

5. Check the dining area from the seats you already use
Stand at the entrance, sit on the sofa and look from the kitchen worktop. Each viewpoint reveals a different side of the dining arrangement. From the living area, you may see the chair backs far more often than the seats. Compare rear silhouettes, upholstery, seams and the rhythm of the legs. Product photographs from the back and side are therefore useful when choosing chairs for an open room.
Keep useful views open. A tall chair back, a high sideboard and a large pendant can overlap in the same sightline and make the room feel busier than each item suggests alone. Sketch these layers or photograph a temporary arrangement at seated eye level. This is a composition exercise rather than a rule that furniture must stay low. Decide which feature should attract attention and give the surrounding pieces enough visual breathing room.
Consider what happens when the table is temporarily untidy. A view straight from the front door to the working end of the table may reveal bags and paperwork every afternoon. A modest change in orientation, a nearby closed storage space or a clearly assigned landing place can improve that view. Solve the actual routine before adding a decorative screen, especially if a screen would interrupt a route or block valued daylight.

6. Create a connection between zones with a few deliberate details
Choose one or two connections that can be recognised from both areas. The dining chairs might echo a curved sofa arm, a dark table base might relate to a shelving frame, or a textured upholstery might sit comfortably beside a plain curtain. These connections give the eye a route through the room. They do not require every piece to come from one furniture range or every surface to carry the same finish.
Compare full shapes before small accessories. A table with a substantial top and a sofa with a deep, enclosed base already bring visual weight. Chairs with a more open frame may provide useful balance. In another room, slim tables and seating on visible legs can leave space for more sculptural dining chairs. Make this comparison using whole-room photographs; a close-up of a fabric sample cannot show how much presence the complete chair will have.
Limit the number of decisions you change at once. Position the main pieces first, then assess the upholstery and finishes, and leave smaller decoration until the arrangement feels settled. If everything feels disconnected, identify the one relationship that is weakest. Repeating another cushion colour throughout the room will not necessarily help if the table is turned away from the main living area or the chairs form an unexpectedly heavy visual barrier.

7. Let lighting describe the dining zone
A light associated with the table can make the dining area easy to identify after dark. Plan its position in relation to the intended table arrangement and the view from nearby seats. The fitting's shape, brightness and height need to suit the room and the people using it. Hold a simple cardboard outline in the proposed position to judge its visual presence before making a final choice or arranging electrical work.
Check how the dining light behaves while someone is watching television or talking on the sofa. An exposed bright source can become distracting from a lower viewpoint, even if it looks comfortable when viewed standing up. Look for reflections in windows and glossy surfaces too. Lighting controls that allow the dining and living areas to be adjusted separately can help the same room support different evening activities.
Keep a second lighting situation in mind for an extended or repositioned table. A fitting that looks centred over the everyday arrangement may relate differently to extra places during a gathering. Draw both arrangements and discuss the options with a qualified installer when changes are needed. Furniture placement can guide the lighting brief, while installation requirements and the chosen fitting's instructions determine what can be carried out safely.

8. Use boundaries that also earn their place
A low sideboard, an open shelving unit or the back of a sofa can suggest where one activity ends and another begins. Choose a boundary because it contributes something useful, such as storing serving dishes or providing a landing surface near the table. Its depth belongs in the measured plan. Include open drawers and cupboard doors so storage remains usable while the dining area is occupied.
Open shelving allows views through it, but its effect changes when filled. A lightly styled display and a shelf packed with books create very different boundaries. Test the proposed density with what you actually intend to store. Tall furniture must be assembled and secured according to its instructions; its apparent weight or position behind a sofa does not replace the required fixing arrangements. Keep access to radiators, switches and necessary equipment clear.
A wall treatment or piece of artwork can establish a dining backdrop without adding another object to walk around. Assess it from both the table and the living area. Consider whether the treatment should stop at a clear architectural edge or continue as part of a broader room scheme. The useful question is whether it helps the dining arrangement feel intentional while preserving the connections that make the open room enjoyable.

9. Worked example: a long room with a garden door
Imagine a rectangular living-dining room measuring 6.4 by 3.8 metres, with the kitchen entrance at one end and a garden door at the other. Two adults and two children eat here daily. Their existing table measures 180 by 90 centimetres. These are schematic example dimensions only. The first drawing places the table across the room and centres it beneath an existing ceiling connection, producing a strong visual division between dining and living.
The family then rehearses dinner with four occupied chairs. Their route from the kitchen to the garden door passes behind the seat closest to the wall, and opening the nearby storage door creates another conflict. They rotate the table so its long side follows the room, move it away from the storage door and test again. The deciding evidence is the repeated walking test, not the fact that the new orientation looks more symmetrical on paper.
From the sofa, the family now sees a row of chair backs. They compare two chair shapes from this viewpoint and keep the more visually open option on the shortlist, subject to comfort and fit checks. A sideboard remains on the solid wall, and the lighting position becomes a separate installation question. The layout succeeds by combining a clear route, practical storage access and a considered view rather than forcing the table to follow one existing ceiling point.

10. Worked example: an L-shaped kitchen and living area
In a second household, the kitchen occupies the short leg of an L-shaped room and the sofa sits around the corner. The dining table initially floats between them with no clear front or back. Two people use it daily and friends visit regularly. Their main complaint is that anyone carrying food has to walk around a chair, while the table appears to belong partly to the kitchen and partly to the television area.
They mark the kitchen-to-table route first and position the table beside it instead of across it. A closed sideboard on the adjacent wall holds dining items, creating a practical association between that wall and the table. They leave the internal corner visually open so a seated person can still take part in conversation with someone on the sofa. The dining area gains a recognisable backdrop without closing the room into separate compartments.
For visitors, they use a second tested arrangement with a movable side table stored in its planned place. They photograph both layouts and keep notes about which chair needs to move first. No permanent divider is required because the daily routes, storage and lighting already establish the dining zone. The example also shows why another household's rectangular-room solution should not be copied without checking the shape and routines of your own home.

11. Build a worksheet that records the room in use
Use a single sheet for each layout so your comparisons stay fair. Record the table position, chair model or stand-in, outside furniture measurements and the household activity being tested. Add the date and a photograph from the same viewpoints each time. A successful test should describe what happened: for example, one person could leave the table while another opened the garden door. A note saying only 'looks spacious' is difficult to use later.
Mark each check as confirmed, needs another test or unsuitable. Keep measurements and preferences in separate columns. This prevents an attractive chair from receiving an assumed pass for a movement you have not tried. Where a new product is involved, note which dimensions are confirmed by its product information and which still require an answer. Preserve the current arrangement until the uncertain points are resolved.
Use the worksheet when comparing layouts with other people. Ask each regular user to try the same sequence: sit down, reach the table, stand up, walk the main route and open the nearby storage. If a movement works only when someone remembers to move another item, write that dependency down. You can then decide whether it is acceptable for occasional guests or too inconvenient for everyday life.
| Check | What to record | Useful test |
|---|---|---|
| Main route | Start, destination and furniture in use | Walk it with an empty tray |
| Dining movement | Chair position when occupied and when leaving | Sit down and stand up naturally |
| Storage | Door or drawer opened fully | Retrieve the items used at dinner |
| Sightline | View from entrance, sofa and kitchen | Take photographs at the usual eye level |
| Evening use | Dining and living lights in the intended setting | Use both areas at the same time |

12. Make the change in stages
Begin with changes you can evaluate using the furniture already at home. Clear temporary clutter, mark two possible table positions and live with each through a normal meal. Do not judge only the newly arranged room while everyone is standing back admiring it. Breakfast, a hurried weekday dinner and the evening routine will reveal different strengths. Keep the arrangement that performs well across the situations that matter most.
Next, create a focused furniture shortlist. Compare chair measurements, rear and side views, upholstery information and the requirements of the whole dining arrangement. Choose the exact model and finish before assuming that a photograph of a similar chair represents it. Confirm any uncertain feature with Colenis and keep the product details with your room worksheet. The best candidate is the one that works within the plan you have actually tested.
Finish with lighting, storage organisation and a small number of decorative decisions. Review the room again once those elements are in place, because an added cabinet or large floor lamp can change a previously clear route. Save the final photographs and your occasional-guest plan. A defined dining area is an arrangement that remains understandable and usable during daily life, with enough flexibility for the moments when the household needs something different.

Frequently asked questions
Does an open-plan dining area need a room divider?
A divider is useful when it provides a needed boundary or storage function, but many rooms can be organised through table position, a clear backdrop and suitable lighting. Test the layout without a divider first. If the activities still interfere, identify the specific problem: a distracting view, missing storage or a route through the dining places. Choose the smallest intervention that addresses that problem and include its full depth and opening movements in the plan.
Should the dining table be closer to the kitchen or the sofa?
Start with the route used to bring food, clear dishes and reach nearby storage. Then consider conversation and views between the two areas. The most convenient position will depend on doors, fixed features and the household's routine. Try more than one table position with the chairs occupied. A slight shift that improves the serving route may be more valuable than centring the table between the kitchen and sofa on an empty drawing.
Can the sofa back form the boundary of the dining area?
Yes, provided the complete arrangement works in use. Check the sofa's actual outside shape and test a dining chair being pulled out while someone sits on the sofa. Keep the important route clear and consider the view of the chair backs from the living seats. Avoid placing loose objects in a narrow gap simply to make the separation look finished. The boundary should still make sense when the dining table is occupied.
Do dining chairs and the sofa need matching upholstery?
They can share a visual connection without using the same upholstery. Compare the room's main shapes, textures and finishes as a complete composition. One repeated feature may provide enough continuity. Assess samples and product photographs in the actual room, and keep care and comfort requirements specific to each piece. A dining chair used around meals and a sofa used for relaxing may require different practical choices even within a coordinated scheme.
What should I do if the existing pendant is off-centre?
First establish the furniture position that works for the room. Check the light from standing and seated viewpoints and sketch any occasional table arrangement. If the fitting needs moving or replacing, discuss the plan with a qualified installer and follow the chosen product's instructions. Avoid accepting an awkward daily layout solely to align with an existing connection. The lighting brief and the furniture plan should inform each other before permanent work begins.
How can I test a layout before the new chairs arrive?
Use measured floor outlines and existing chairs as an initial rehearsal. Record the differences between the stand-in and the candidate's published outside dimensions, including arms and any swivel movement. Try the main routes with somebody seated and open nearby storage fully. This process can reveal obvious conflicts, but it does not confirm the exact fit or comfort of an unseen model. Resolve missing measurements before ordering and assess the complete arrangement after delivery.
Your next step
A clear dining zone starts with a useful position and a believable everyday routine. Measure the fixed features, trace the main journeys and draw chairs as moving objects. Then review the arrangement from the entrance, kitchen and sofa, where the rear view of a dining chair may matter as much as its front.
Choose two arrangements, test them during ordinary meals and keep a short record of what worked. Once the layout is settled, use furniture details, lighting and storage to make the area feel intentional. Bring the same worksheet to your Colenis shortlist so the finished room connects practical movement with the atmosphere you want at home.
Compare chair dimensions, shapes and finishes alongside your tested room plan.
Explore Colenis dining chairs ↗


